【JavaScript】スロットの作り方
こんにちは、筒井です。
今回の記事では、jsで作る簡単なスロットの作り方を紹介します。
この記事でわかること
DOMとスタイリング
先に完成形はこちらです。
まずは、DOMを用意してスタイリングします。
<section class="section">
 <div class="slot">
  <div class="wheel js-slot_wheel">
   <div class="wheelInner js-slot_wheel_inner">
    <div class="wheelPic"></div>
   </div>
  </div>

  <div class="btns">
   <div class="btn js-slot_startbtn"><span>START</span></div>
   <div class="btn js-slot_stopbtn"><span>STOP</span></div>
  </div>
 </div>
</section>
jsで取得する要素にはjs- 〜というクラスをふっておきました。
今回のスロットは、.wheelInnerをtransformでy方向に動かすことで実現します。
.section {
 width: 100vw;
 height: 100vh;
 display: flex;
 justify-content: center;
 align-items: center;
 flex-direction: column;
}

.wheel {
 width: 40px;
 height: 120px;
 border: 1px solid #000;
 margin: 0 auto;
 overflow: hidden;
}

.wheelPic {
 background-image: url("../resource/img/pic_slot01.png");
 background-position: 50% 50%;
 background-repeat: no-repeat;
 background-size: cover;
 width: 40px;
 height: 400px;
}

.btns {
 display: flex;
 margin-top: 50px;
}

.btn {
 background-color: #000;
 border-radius: 50%;
 width: 60px;
 height: 60px;
 cursor: pointer;

 display: flex;
 justify-content: center;
 align-items: center;

 span {
  color: #fff;
  font-weight: 700;
 }

 &:nth-child(2) {
  margin-left: 30px;
 }
}
スロット画像について、少し注意です。
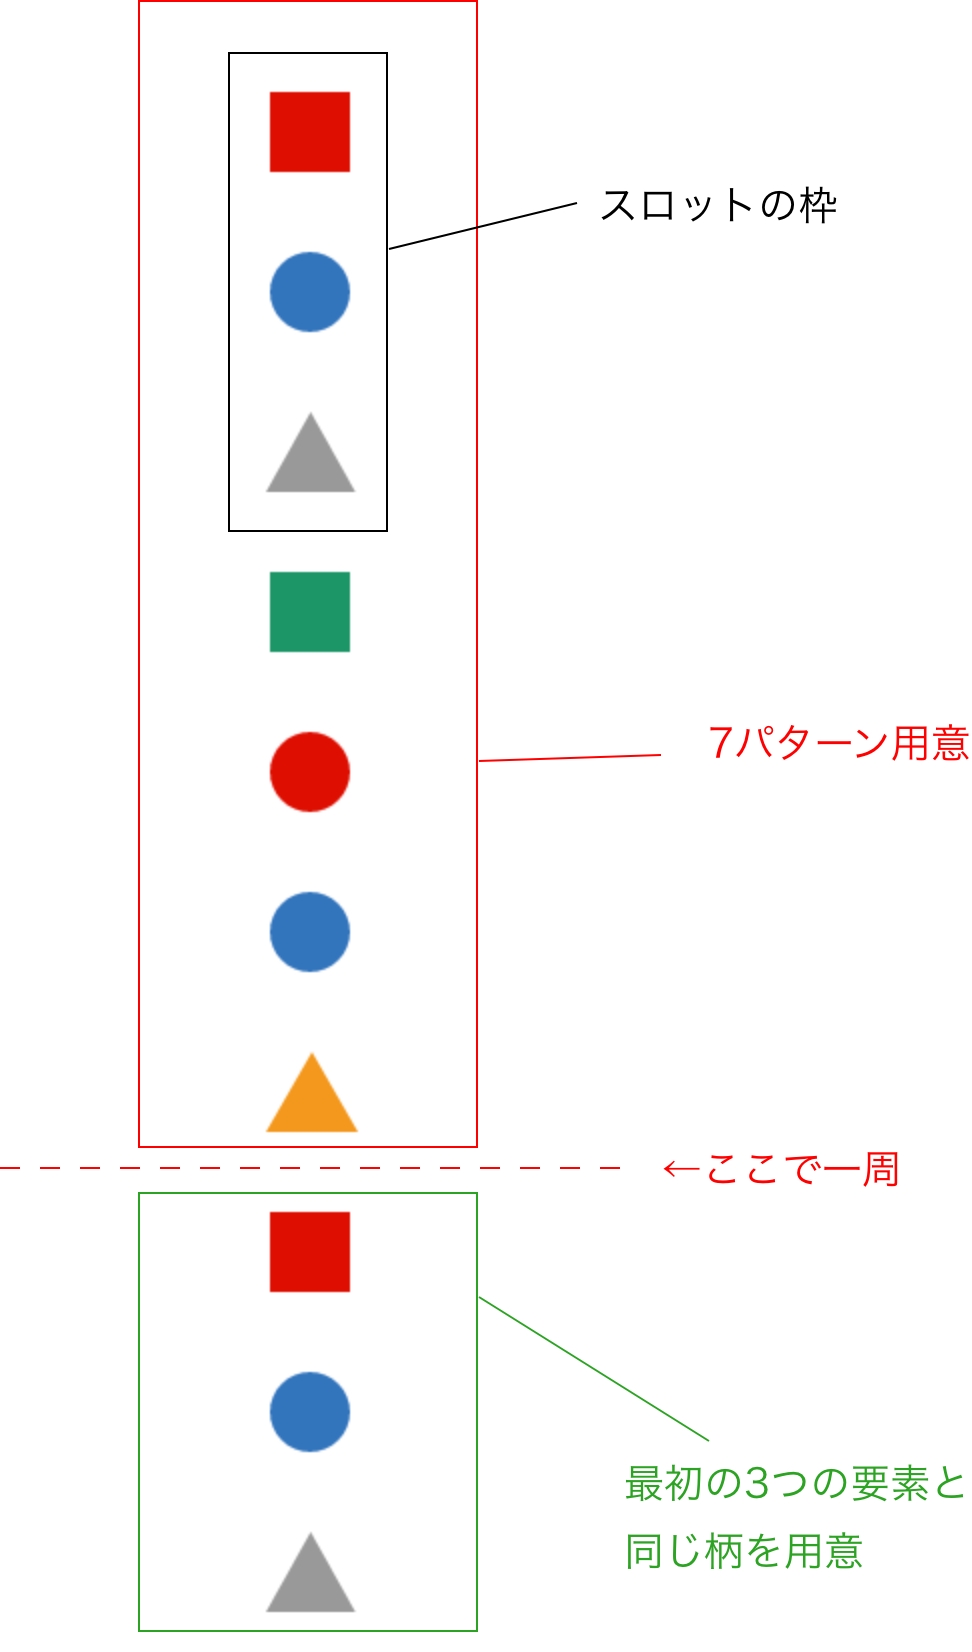
今回、こちらの画像を使用していますが、
無限ループさせるため、最後の3つは最初の3つと同じ柄を用意してください。
7つ目の柄まで見えた時点で、1周目が終わりということになります。
用意するファイル
まずは以下の2ファイルを用意します。
・Controller.js
・Renderer.js
Controller.jsには、ロジック部分、Renderer.jsには、演出(描画)部分を書いていきます。
何度も使い回せるようにクラスで書いていきます。
ロジック部分
書くべき内容としては、
・startボタンを押したら、スロットゲーム開始
・stopボタンを押したら、スロットが止まる
だけです。
export default class Controller {
 constructor() {
  this.startbtn = document.querySelector(".js-slot_startbtn");
  this.stopbtn = document.querySelector(".js-slot_stopbtn");

  this.setup();
  this.setEvents();
 }

 setup() {
  this.renderer = new Renderer();
 }

 setEvents() {
  this.startbtn.addEventListener("click", (e) => {
   this.renderer.start();
  });

  this.stopbtn.addEventListener("click", (e) => {
   this.renderer.stop();
  });
 }
}
描画部分担当のRendererも、Controllerでインスタンス化しておきます。
描画部分
描画部分は、少しややこしいので順番に説明していきます。
1.とにかくy方向に動かす
細かいことは置いておいて、まずは、.js-slot_wheel_innerをrequestAnimationFrameでy方向に動かすことを考えます。
y += speedのようにして、yにspeedを足してやることで動かします。
今回は上向きに動かそうと思うので、最後に、yに-1をかけてやります。
export default class Controller extends Base {
 constructor() {
  super();

   this.wheel = document.querySelector(".js-slot_wheel_inner");
   this.isUEv = true;

  this.speed = 1;
  this.y = 0;

  this.setEvents();
 }

 update() {
  this.y += this.speed; // yの値を増やしていく
  const y = this.y * -1; // 上方向に動かす
  this.wheel.style.transform = `translate3d(0px, ${y}px, 0px)`;
 }

 start() {}

 stop() {}

 setEvents() {
  super.setEvents();
 }
}
2.startボタンを押したときに動かす
今のままだと、ページが読み込まれるとすぐに動いてしまうので、
スタートボタンを押すと動くようにします。
easingをかけて動き始めてほしいので、gsapを使います。
また、gsapで扱いやすいように、speedの値もthis.speed = { value: 0 };のようにオブジェクトにします。
export default class Controller extends Base {
 constructor() {
  super();

  this.wheel = document.querySelector(".js-slot_wheel_inner");
  this.isUEv = true;

  this.speed = { value: 0 }; // オブジェクトに変更
  this.y = 0;

  this.setEvents();
 }

 update() {
  this.y += this.speed.value; // this.speed.valueに変更
  const y = this.y * -1;

  this.wheel.style.transform = `translate3d(0px, ${y}px, 0px)`;
 }

 start() {
  this.tl = gsap.timeline();

  this.tl.to(this.speed, 5, {
   value: 10,
   ease: "expo.out",
  });
 }

 ...
}
3.ループさせる
次にループさせることを考えます。
どこで一周するかというと、再び赤い四角がスロット枠の一番上に到達した時です。
赤い四角は2つありますが、
2つ目の赤い四角がスロット枠の一番上に到達した瞬間、
一気にtransformで初期の位置に戻します。
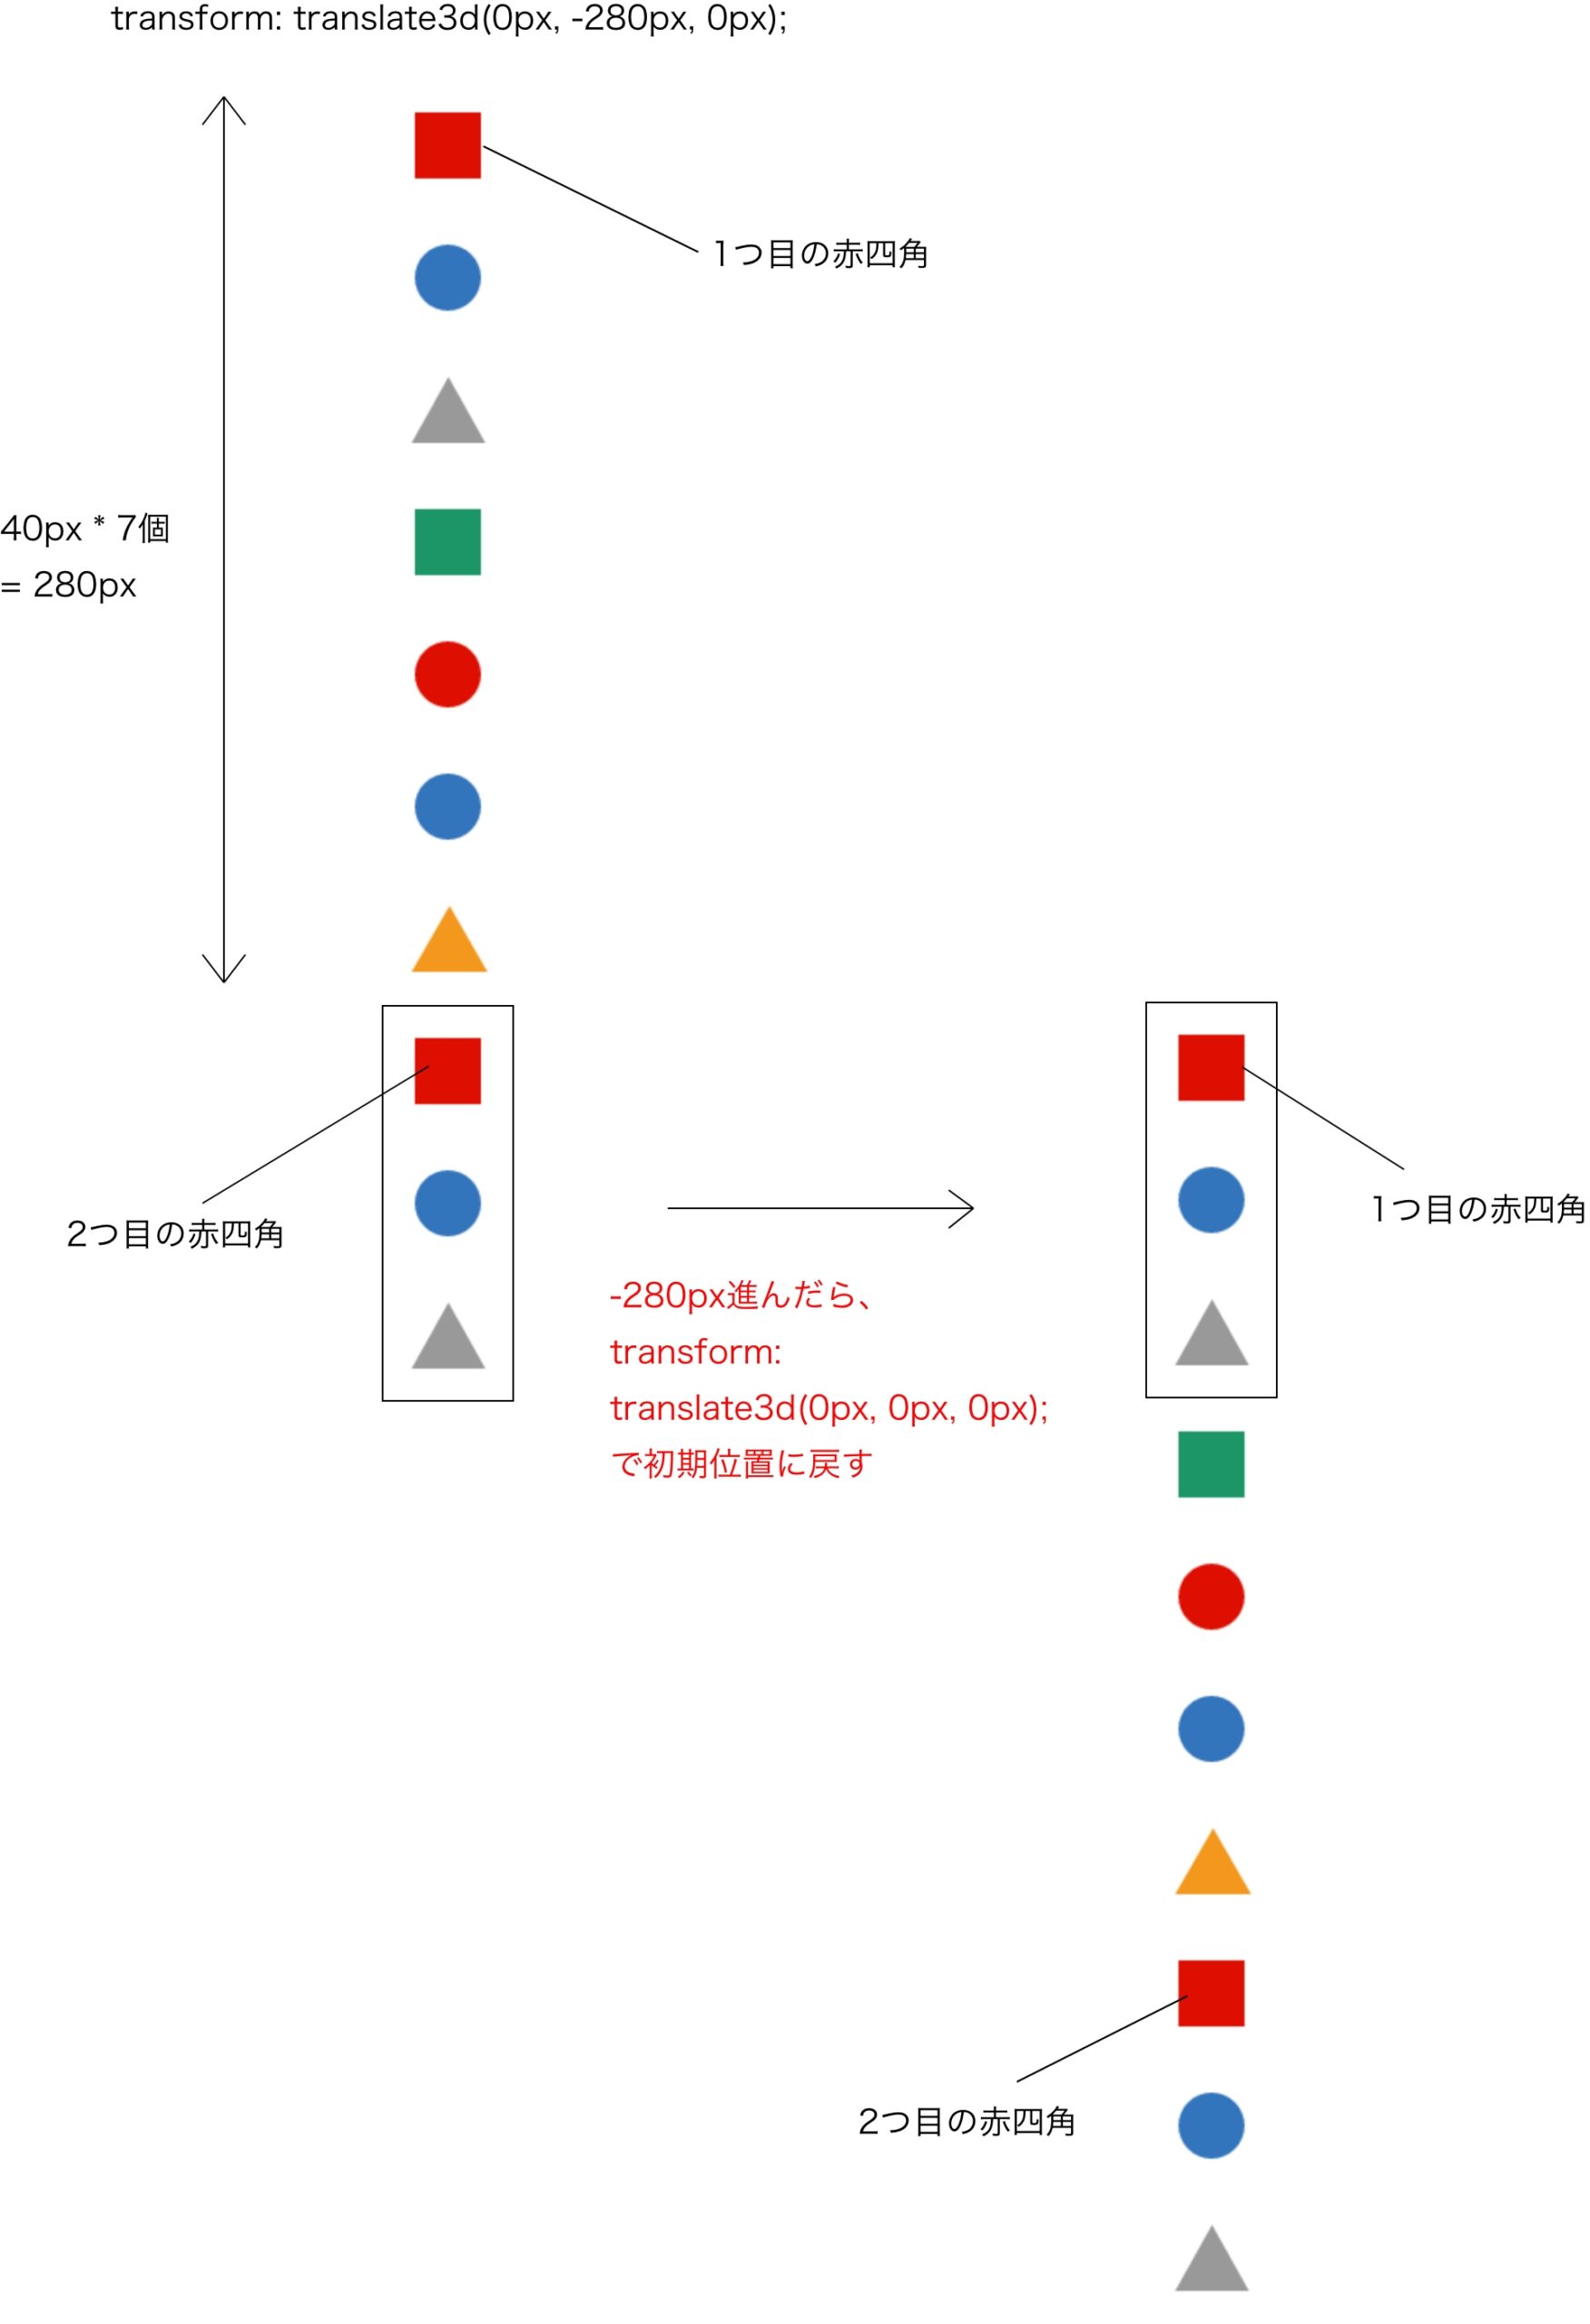
図の方がわかりやすいと思うので載せておきます。
初期位置にはどのタイミングで戻すのかというと、
一つあたりの 図形の高さが40pxで、それが7つ進んだ時、つまり40 * 7 =280px進んだ時です。
具体的には、this.wheelが
0px
-1px
..
-200px
…
-280px
———————————
0px(初期位置に戻す)
-1px
-2px
..
-280px
———————————
0px(初期位置に戻す)
…
こんな感じで、ずっとループすればスロットの回転が実現しそうです。
このようなループは余り(%)を使うと便利です。
export default class Controller extends Base {
 constructor() {
  super();

  this.wheel = document.querySelector(".js-slot_wheel_inner");
  this.isUEv = true;

  this.speed = { value: 0 };
  this.y = 0;
  this.picHight = 40; // 柄一つ分の高さ
  this.len = 7; // 7個動くと一周

  this.setEvents();
 }

 update() {
  this.y += this.speed.value;
  const y = -1 * (this.y % (this.picHight * this.len)); // -280を超えると0に戻るようにする

  this.wheel.style.transform = `translate3d(0px, ${y}px, 0px)`;
 }

 ...
}
4.スロットをキリのいいところで止める
とりあえずスロットを止めるとなると、stop()はこんな感じだと思います。
...

stop() {
 if (this.tl) this.tl.kill();

 this.tl = gsap.timeline();

 this.tl
  .set(this.speed, {
   value: 0,
  });
}

...これを見ると、キリの良いところで止める必要があることがわかります。
キリがいいところとは、具体的に、this.wheelがy方向に、以下の数値分進んだ時です。
スロットの柄の区切り目のところですね。
0px
-40px
-80px
-120px
-160px
-200px
-280px
図形一つ分の高さが、-40pxなので、yが-40の倍数だとピタッととまるはずです。
コードはこうなります。
export default class Controller extends Base {
 constructor() {
  super();

  this.wheel = document.querySelector(".js-slot_wheel_inner");
  this.isUEv = true;

  this.speed = { value: 0 };
  this.num = { value: 0 }; // this.yをthis.numに変更
  this.picHight = 40;
  this.len = 7;

  this.setEvents();
 }

 update() {
  this.num.value += this.speed.value;
  const y = -1 * ((this.num.value * this.picHight) % (this.picHight * this.len)); // ループするように, キリよく止まるように

  this.wheel.style.transform = `translate3d(0px, ${y}px, 0px)`;
 }

 start() {
   this.tl = gsap.timeline();

   this.tl.to(this.speed, 5, {
    value: 0.4, // 値を下げる
    ease: "expo.out",
   });
  }

 stop() {
  if (this.tl) this.tl.kill();
   this.tl = gsap.timeline();

   this.tl
       .set(this.speed, { value: 0, })
       .to(this.num, 4, {
         value: 0,
         ease: "power3.out",
       });
   }
...
}
this.num.value * this.picHightが、さっきのthis.yに相当します。
これで、this.num.value * this.picHightは、必ずthis.picHight(-40)の倍数になります。
this.num.value * this.picHightの値はとても大きいので、
this.speed.valueの値を下げて回転スピードを調整しています。
5.スロットを逆回転させずに止める
現状、一つ問題点があります。
見ての通り、スロットが逆回転してしまいます。
ちなみに、this.num.valueを1にすると
...

stop() {
 if (this.tl) this.tl.kill();

 this.tl = gsap.timeline();

 this.tl
  .set(this.speed, {
   value: 0,
  })
  .to(this.num, 4, {
   value: 1,
   ease: "power3.out",
  });
}

...柄が、初期値から一つ分進んだところで止まることがわかります。(逆回転ですが)
同様に、this.num.valueを7にすると、7番目の図形のところで止まります。
ここの値をいじれば、どこで止まるかコントロールできそうです。
そして、逆回転をしないようにどうすれば良いかを考えます。
例えば、初期位置でスロットを止めるためには、さまざまな値が考えられます。
this.num.value * this.picHightが
0 * 40px = 0px
7 * 40px = 280px
14 * 40px = 560px
21 * 40px = 840px
…
など。
この差は、何回転したかに関わります。
0px (1回転目)
280px(2回転目 – 図形が7個進んだところ)
560px(3回転目 – 図形が14個進んだところ)
840px(4回転目 – 図形が21個進んだところ)
…
1回転目の途中で、ストップボタンを押して、初期位置の図形が出て欲しい時は、
this.num.valueを7にすれば良いです。
2回転目の途中でストップボタンを押した場合、this.num.valueを14
3回転目の途中でストップボタンを押した場合、this.num.valueを21
…
にすれば良いです。
それを求めるためには、stopボタンを押した時点で、現在何周目かを算出します。
以下で、計算可能です。
const lap = Math.ceil((this.num.value * this.picHight) / 280);
何周目であるかに加えて、図形で言えば、何個進んだかの情報が必要になります。
lap * 7
でそれを算出できます。
7というのは、1周あたりに含まれる図形の数です。
this.lenという変数に格納しておき、全体のコードは以下の通りになります。
export default class Controller extends Base {
 constructor() {
  super();

 this.wheel = document.querySelector(".js-slot_wheel_inner");
  this.isUEv = true;

  this.speed = { value: 0 };
  this.num = { value: 0 };
  this.picHight = 40;
  this.len = 7;

  this.setEvents();
 }

 update() {
  this.num.value += this.speed.value;
  const y = -1 * ((this.num.value * this.picHight) % (this.picHight * this.len)); // ループするように, キリよく止まるように

  this.wheel.style.transform = `translate3d(0px, ${y}px, 0px)`;
 }

 ...

 stop() {
  if (this.tl) this.tl.kill();

  // 現在何周目か
  const lap = Math.ceil((this.num.value * this.picHight) / 280);

  this.tl = gsap.timeline();

  this.tl
  .set(this.speed, {
   value: 0,
  })
  .to(this.num, 4, {
   value: lap * this.len,
   ease: "power3.out",
  });
  }

  ...
}
逆回転せずにキリよく止まるようになりました!
ただ、回転がたりてない感じがすごいので、lapに+1をして、1周多く回って止まるようにします。
const lap = Math.ceil((this.num.value * this.picHight) / 280) + 1;
6.スロットをランダムなところで止める
最後にランダムな位置で止まるようにします。
現状、this.num.valueがthis.lenの倍数になってるので、
いつも初期位置で止まるようになってしまってます。
value: lap * this.len + 1 => 2番目の図形で止まる
value: lap * this.len + 2 => 3番目の図形で止まる
value: lap * this.len + 3 => 4番目の図形で止まる
です。
なので、1 〜 7のランダムな数値を足してあげます。
minからmaxの範囲でランダムな整数を作るには、以下の関数を使います。
const randomInt = (min, max) => {
  return Math.floor(Math.random() * (max + 1 - min) + min);
};
コード全文はこうなります。
const randomInt = (min, max) => {
  return Math.floor(Math.random() * (max + 1 - min) + min);
};

export default class Controller extends Base {
 constructor() {
  super();

 this.wheel = document.querySelector(".js-slot_wheel_inner");
  this.isUEv = true;

  this.speed = { value: 0 };
  this.num = { value: 0 };
  this.picHight = 40;
  this.len = 7;

  this.setEvents();
 }

 update() {
  this.num.value += this.speed.value;
  const y = -1 * ((this.num.value * this.picHight) % 280);

  this.wheel.style.transform = `translate3d(0px, ${y}px, 0px)`;
 }

 start() {
  this.tl = gsap.timeline();

  this.tl.to(this.speed, 5, {
   value: 0.4,
   ease: "expo.out",
  });
 }

 stop() {
  if (this.tl) this.tl.kill();

  // 現在何周目か + 1回転足す
  const lap = Math.ceil((this.num.value * this.picHight) / (this.picHight * this.len)) + 1;

  this.tl = gsap.timeline();

  this.tl
  .set(this.speed, {
   value: 0,
  })
  .to(this.num, 4, {
   value: lap * this.len + randomInt(0, this.len),
   ease: "power3.out",
  });
 }

 setEvents() {
  super.setEvents();
 }
}
ランダムなところで止まるようになりました!
今回はinnerを動かしましたが、各要素を個別に動かして、スロットを作ることも可能です。
その場合、各要素を歪めたり、色を変えたりなど、より柔軟に演出を入れることができます。
最後までお読みいただきありがとうございました。


